<?xml version="1.0" encoding="utf-8"?><feed xmlns="http://www.w3.org/2005/Atom" ><generator uri="https://jekyllrb.com/" version="3.10.0">Jekyll</generator><link href="https://w1024ji.github.io/feed.xml" rel="self" type="application/atom+xml" /><link href="https://w1024ji.github.io/" rel="alternate" type="text/html" /><updated>2026-05-13T09:42:43+00:00</updated><id>https://w1024ji.github.io/feed.xml</id><title type="html">Let’s keep a record</title><subtitle>Hello! Welcome to my blog. I am trying to keep a record of what I did.</subtitle><author><name>Wonji Lee</name></author><entry><title type="html">Graph &amp;amp; DP</title><link href="https://w1024ji.github.io/leetcode/2026/05/13/leetcode-graph-and-dp.html" rel="alternate" type="text/html" title="Graph &amp;amp; DP" /><published>2026-05-13T00:00:00+00:00</published><updated>2026-05-13T00:00:00+00:00</updated><id>https://w1024ji.github.io/leetcode/2026/05/13/leetcode-graph-and-dp</id><content type="html" xml:base="https://w1024ji.github.io/leetcode/2026/05/13/leetcode-graph-and-dp.html"><![CDATA[<h3 id="1-number-of-islands-medium">1. Number of Islands (Medium)</h3>

<ul>
  <li>섬을 발견하면 개수를 세고, 센 섬을 모두 바다로 바꾸자.</li>
  <li>지도의 왼쪽 위부터 오른쪽 아래까지 흝어보면서, 1을 발견하면 count ++ 하고, 방금 밟은 땅(1)과 연결된 모든 땅을 찾아 전부 0으로 바꿔준다. (이게 sink() 의 역할이다)</li>
  <li>이중 for 문으로 모든 칸(r, c)을 순회하면 된다.</li>
  <li>참고로 sink() 는 DFS 이다!</li>
</ul>

<pre><code class="language-python">class Solution:
    def numIslands(self, grid: List[List[str]]) -&gt; int:
        def sink(r, c):
            if r&lt;0 or r&gt;=len(grid) or c&lt;0 or c&gt;=len(grid[0]) or grid[r][c] == '0':
                return
            
            # 땅을 밟았다면 0으로 바꿔주기
            grid[r][c] = '0'

            sink(r + 1, c) # 하
            sink(r - 1, c) # 상
            sink(r, c + 1) # 우
            sink(r, c - 1) # 좌

        count = 0
        for r in range(len(grid)):
            for c in range(len(grid[0])):
                if grid[r][c] == '1':
                    count += 1
                    sink(r, c)

        return count
</code></pre>

<h3 id="2-rotting-oranges-medium">2. Rotting Oranges (Medium)</h3>

<ul>
  <li>이전 문제 ‘Number of Islands’에서는 DFS를 이용해 한 번 땅을 밟으면 끝까지 파고들어 연결된 섬을 지웠다. 하지만 이 문제는 오렌지들이 동시에! 주변을 오염시키기 때문에, 그리고 시간을 재야 하기 때문에 BFS를 사용해야 한다. 이를 위해 큐 deque를 사용했다.</li>
  <li>일단 첫번째 for문에서 0분일 때의 상태를 파악했다. (썩을 귤 몇개? 싱싱한 귤 몇 개?) 그리고 썩을 귤들을 모두 큐에 한꺼번에 넣었다.</li>
  <li>while 문이 BFS 역할을 맡았다. 1분 단위로 시간을 끊어서 처리한다.</li>
  <li>level_size = len(queue) 가 중요한 포인트이다! 현재 큐에 들어있는 썩은 귤의 개수만큼을 돌림으로써, 딱 이번 1분 동안 전염시킬 수 있는 귤만 처리하고 넘어갈 수 있게 만들었다.</li>
  <li>while 문 안에 있는 이중 for 문은 주변의 싱싱한 귤을 썩게 만드는 역할을 맡았다.</li>
  <li>큐에서 썩은 귤을 하나 꺼내 상하좌우를 살피고, 싱싱한 귤(1)을 발견하면 즉시 오염시켜(2) 중복 방문을 방지한다.</li>
  <li>fresh -= 1 하는 것도 잊지 않기!</li>
</ul>

<pre><code class="language-python">from collections import deque

class Solution:
    def orangesRotting(self, grid: List[List[int]]) -&gt; int:
        rows, cols = len(grid), len(grid[0])
        queue = deque()
        fresh = 0
        minutes = 0

        # 일단 스캔부터 한다. 썩은 귤은 모두 큐에 넣고, 싱싱한 귤은 총 개수를 센다
        for r in range(rows):
            for c in range(cols):
                if grid[r][c] == 2:
                    queue.append((r, c))
                elif grid[r][c] == 1:
                    fresh += 1

        if fresh == 0:
            return 0
                       # 하    # 상     # 우     # 좌
        directions = [(1, 0), (-1, 0), (0, 1), (0, -1)]

        # 큐가 있고 아직 싱싱한 귤이 있으면
        while queue and fresh &gt; 0:
            level_size = len(queue)
            minutes += 1

            for _ in range(level_size):
                r, c = queue.popleft() # 튜플을 쪼개서 받을 수 있다!
                
                for dr, dc in directions:
                    nr, nc = r + dr, c + dc

                    if 0&lt;=nr&lt;rows and 0&lt;=nc&lt;cols and grid[nr][nc] == 1:
                        grid[nr][nc] = 2
                        fresh -= 1

                        queue.append((nr, nc)) # 새롭게 썩은 귤을 큐에 넣는다
        
        return minutes if fresh == 0 else -1
</code></pre>

<h3 id="3-climbing-stairs-easy">3. Climbing Stairs (Easy)</h3>

<ul>
  <li>이 문제는 이산수학 수업에서도 자주 본 아주 유명한 문제이다.</li>
  <li>포인트는, 처음부터 끝까지 모든 경우의 수를 직접 세는 게 아니라 도착하기 바로 직전의 상황을 상상하면 바로 해결이 된다!</li>
  <li>n 층까지 가는 방법의 수는 = n-1 층까지 가는 방법의 수 + n-2 층까지 가는 방법의 수 이다.</li>
  <li>이를 점화식으로 표현하면 dp[i] = dp[i - 1] + dp[i - 2] 이다.</li>
  <li>dp 배열을 준비하고 3층부터 n층까지 그 결과를 적어두면 된다.</li>
</ul>

<pre><code class="language-python">class Solution:
    def climbStairs(self, n: int) -&gt; int:
        # 예외 처리: 1층이나 2층은 그대로 반환
        if n &lt;= 2:
            return n
            
        # n층까지 기록할 수 있는 배열 만들기
        dp = [0] * (n + 1)
        
        dp[1] = 1
        dp[2] = 2
        
        # 3층부터 n층까지 차근차근 올라가기
        for i in range(3, n + 1):
            dp[i] = dp[i - 1] + dp[i - 2]
            
        return dp[n]
</code></pre>

<h3 id="4-coin-change-medium">4. Coin Change (Medium)</h3>

<ul>
  <li>거스름돈 문제이다. 가장 적은 동전의 개수로 거슬러 줘야 한다.</li>
  <li>아이디어는 이렇다. ‘방금 낸 동전 하나를 빼고 생각해보자’. 만약, 11원을 만들어야 하는데 내게 1원, 2원, 5원짜리 동전이 있다면 총 세가지의 경우 중에서 가장 동전의 개수가 적은 경우이다.
    <ol>
      <li>1원짜리 동전을 마지막으로 쓴 경우 → (10원을 만드는 최소 동전들) + 1개</li>
      <li>2원짜리 동전을 마지막으로 쓴 경우 → (9원을 만듦) + 1개</li>
      <li>5원짜리 동전을 마지막으로 쓴 경우 → (6원을 만듦) + 1개</li>
    </ol>
  </li>
  <li>이걸 점화식으로 표현하면 dp[a] = min(dp[a], dp[a - coin] + 1) 이다.</li>
  <li>처음에 dp 배열의 모든 칸을 큰 값으로 채워두고 이중 for문으로 bottom-up을 해준다.</li>
  <li>그리고 마지막 리턴문에서 배열 원소의 값이 amount+1 으로 그대로라면, 가진 동전들로는 그 금액을 만들 수 없다는 뜻이니까 -1을 반환한다.</li>
</ul>

<pre><code class="language-python">from typing import List

class Solution:
    def coinChange(self, coins: List[int], amount: int) -&gt; int:
        dp = [amount + 1] * (amount + 1)
        
        dp[0] = 0
        
        for a in range(1, amount + 1):
            for coin in coins:
                if a - coin &gt;= 0:
                    dp[a] = min(dp[a], dp[a - coin] + 1)
                    
        return dp[amount] if dp[amount] != amount + 1 else -1
</code></pre>]]></content><author><name>Wonji Lee</name></author><category term="LeetCode" /><category term="Other" /><summary type="html"><![CDATA[1. Number of Islands (Medium)]]></summary></entry><entry><title type="html">[리눅스 3주차] 환경 변수 관리와 쉘 스크립팅</title><link href="https://w1024ji.github.io/linux/2026/05/12/linux-3rd.html" rel="alternate" type="text/html" title="[리눅스 3주차] 환경 변수 관리와 쉘 스크립팅" /><published>2026-05-12T00:00:00+00:00</published><updated>2026-05-12T00:00:00+00:00</updated><id>https://w1024ji.github.io/linux/2026/05/12/linux-3rd</id><content type="html" xml:base="https://w1024ji.github.io/linux/2026/05/12/linux-3rd.html"><![CDATA[<p>터미널 창을 끄면 기껏 메모해 둔 export 환경 변수가 하얗게 날아가 버린다. 이걸 해결하기 위해선 리눅스라는 운영체제 자체에 비밀번호를 안전하고 영구적으로 숨겨두고,
필요할 때만 몰래 꺼내 쓰도록 만들어야 한다. 
어떻게 해야 할까? 
.bashrc 파일에 적고 os 라이브러리를 이용해 가져오면 된다!</p>

<h2 id="bashrc를-활용한-환경-변수-영구-등록">.bashrc를 활용한 환경 변수 영구 등록</h2>
<p>리눅스(Ubuntu)에는 사용자가 로그인할 때마다 자동으로 읽어 들이는 환경 설정 파일이 있다. 
바로 홈 디렉토리에 숨어있는 .bashrc (또는 .profile) 파일이다. 여기에 비밀번호를 적어두면 평생 지워지지 않는다.</p>

<pre><code>nano ~/.bashrc
</code></pre>

<ul>
  <li>환경 변수 추가하기</li>
</ul>

<p>파일의 맨 아랫줄 빈 공간에 우리가 사용할 가상의 API 키를 적어주자</p>

<pre><code>export MY_API_KEY="my_secret_aws_key_999"
</code></pre>

<ul>
  <li>변경 사항 즉시 적용하기!! (중요하다~)
파일을 수정했다고 바로 적용되는 것이 아닙니다. 컴퓨터를 껐다 켜거나, 리눅스에게 “설정 파일 다시 읽어!”라고 명령해야 한다.</li>
</ul>

<pre><code>source ~/.bashrc
이제 터미널을 껐다 켜도 echo $MY_API_KEY를 치면 비밀번호가 잘 출력된다.
</code></pre>

<h2 id="파이썬에서-변수-불러오기">파이썬에서 변수 불러오기</h2>
<p>이제 파이썬에서 이 키를 가져다 써보자. 
복잡한 외부 라이브러리나 무거운 설정 클래스를 짤 필요 없이, 파이썬 내장 라이브러리인 os를 사용하는 것이 좋다.</p>

<pre><code>cd ~/server_prac
nano api_test.py
</code></pre>

<ul>
  <li>os.getenv를 사용하여 운영체제에 숨겨둔 키를 안전하게 가져온다</li>
</ul>

<pre><code>import os

api_key = os.getenv('MY_API_KEY')

if api_key:
    print(f"successfully loaded api key!: {api_key}")
else:
    print("error!")
</code></pre>

<h2 id="쉘-스크립트로-파일-압축-백업하기">쉘 스크립트로 파일 압축 백업하기</h2>

<p>
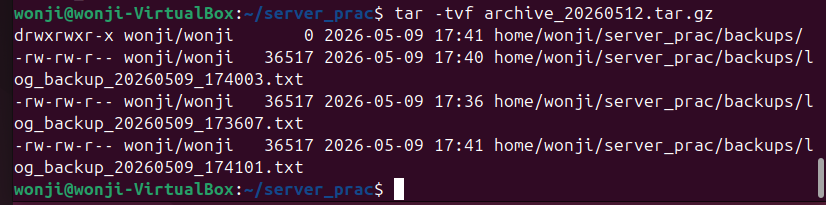
이번엔 지정된 폴더의 파일들을 하나로 묶어서 꽉 압축(zip)해 버리는 스크립트를 짜보자. 리눅스에서는 주로 tar 명령어를 쓴다.</p>

<ul>
  <li>압축 스크립트 작성</li>
</ul>

<pre><code>
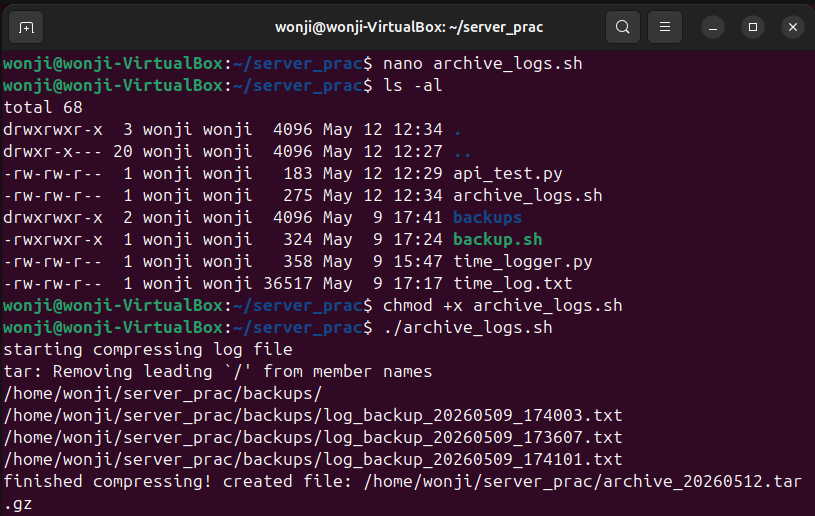
nano archive_logs.sh
</code></pre>

<ul>
  <li>bash 코드 작성</li>
  <li>tar 명령어로 폴더 전체를 압축</li>
  <li>-c: 새로 만들기, -z: gzip 압축, -v: 진행상황 보이기, -f: 파일명 지정</li>
</ul>

<pre><code>#!/bin/bash

TODAY=$(date +%Y%m%d)

SOURCE_DIR="/home/wonji/server_prac/backups"
TARGET_FILE="/home/wonji/server_prac/archive_${TODAY}.tar.gz"

echo "로그 파일 압축을 시작"

tar -czvf $TARGET_FILE $SOURCE_DIR

echo "압축 완료! 생성된 파일: $TARGET_FILE"

</code></pre>

<ul>
  <li>실행 권한 부여 및 테스트</li>
</ul>

<pre><code>chmod +x archive_logs.sh
./archive_logs.sh
</code></pre>

<p><img src="/photos/tar.png" alt="tar" /></p>

<p><img src="/photos/tvf.png" alt="tvf" /></p>]]></content><author><name>Wonji Lee</name></author><category term="Linux" /><category term="Other" /><summary type="html"><![CDATA[터미널 창을 끄면 기껏 메모해 둔 export 환경 변수가 하얗게 날아가 버린다. 이걸 해결하기 위해선 리눅스라는 운영체제 자체에 비밀번호를 안전하고 영구적으로 숨겨두고, 필요할 때만 몰래 꺼내 쓰도록 만들어야 한다. 어떻게 해야 할까? .bashrc 파일에 적고 os 라이브러리를 이용해 가져오면 된다!]]></summary></entry><entry><title type="html">[리눅스 2주차] 서버 프로세스 제어와 자동화 실습</title><link href="https://w1024ji.github.io/linux/2026/05/11/linux-2nd.html" rel="alternate" type="text/html" title="[리눅스 2주차] 서버 프로세스 제어와 자동화 실습" /><published>2026-05-11T00:00:00+00:00</published><updated>2026-05-11T00:00:00+00:00</updated><id>https://w1024ji.github.io/linux/2026/05/11/linux-2nd</id><content type="html" xml:base="https://w1024ji.github.io/linux/2026/05/11/linux-2nd.html"><![CDATA[<p>리눅스…
리눅스를 좋아한다. 이번 학기에 운영체제를 배우면서 리눅스에 대해 더 자세히 알게 되었는데 역시 흥미롭다.
외울 게 산더미고 가끔 지루하지만.. ^^;
원래 ‘리눅스 1주차’ 에서 자주 쓰는 명령어를 다시 공부하려고 했는데 음~ 대강 기억나기 때문에 (그리고 모르면 구글링하면 되니까)
잘 모르고 있는 것들을 실습하고 싶었다. 오늘은 간단하게 좀비 프로세스랑 크론을 실습해봤다.</p>

<hr />

<h2 id="1-프로세스-제어-백그라운드-실행과-kill">1. 프로세스 제어: 백그라운드 실행과 Kill</h2>
<ul>
  <li><strong>실습 목적:</strong> 내가 실행한 프로그램이 터미널을 멈추게 하지 않고(Foreground) 뒤에서 조용히 일하게(Background) 만드는 방법과, 불필요한 프로세스를 찾아 직접 종료하는 생애주기를 이해하기</li>
</ul>

<p><strong>작성 파일 (<code>time_logger.py</code>)</strong></p>
<pre><code class="language-python">import time
from datetime import datetime

# 1초마다 로그 파일에 현재 시간을 기록하는 무한 루프 스크립트
with open("time_log.txt", "a") as f:
    while True:
        now = datetime.now().strftime("%Y-%m-%d %H:%M:%S")
        f.write(f"[{now}] server is working its ass off\n")
        f.flush() 
        time.sleep(1)
</code></pre>

<h3 id="사용한-명령어">사용한 명령어</h3>

<ul>
  <li>
    <p>python3 time_logger.py &amp; : 뒤에 &amp;를 붙여 백그라운드로 실행</p>
  </li>
  <li>
    <table>
      <tbody>
        <tr>
          <td>ps aux</td>
          <td>grep time_logger.py</td>
          <td>grep -v grep : 실행 중인 프로세스 ID(PID) 찾기</td>
        </tr>
      </tbody>
    </table>
  </li>
  <li>kill -9 <PID> : 프로세스 강제 종료</PID></li>
</ul>

<h2 id="2-무중단-서비스-만들기-systemd">2. 무중단 서비스 만들기: systemd</h2>

<p>실습 목적: 서버가 재부팅되거나 메모리 부족 등으로 프로그램이 갑자기 죽었을 때, 관리자가 깨우지 않아도 시스템이 알아서 다시 살려내는 ‘자가 치유(Self-healing)’를 구현하자!</p>

<p>작성 파일 (/etc/systemd/system/timelogger.service)</p>

<pre><code>Ini, TOML
[Unit]
Description=My Time Logger Background Service
After=network.target

[Service]
User=wonji
WorkingDirectory=/home/wonji/server_prac
ExecStart=/usr/bin/python3 /home/wonji/server_prac/time_logger.py
Restart=always # 핵심: 프로그램이 죽으면 무조건 다시 살려냄

[Install]
WantedBy=multi-user.target
</code></pre>

<h3 id="사용한-명령어-1">사용한 명령어</h3>

<ul>
  <li>
    <p>sudo systemctl daemon-reload : 설정 파일 적용</p>
  </li>
  <li>
    <p>sudo systemctl start timelogger : 서비스 시작</p>
  </li>
  <li>
    <p>sudo systemctl status timelogger : 구동 상태 확인 (active 확인)</p>
  </li>
</ul>

<h2 id="3-정기-스케줄링-cron">3. 정기 스케줄링: cron</h2>
<p>실습 목적: 매일 자정 로그 백업, 매주 일요일 DB 정리 등 주기적인 반복 작업을 사람이 아닌 서버가 정해진 시간에 정확히 알아서 수행하도록 자동화</p>

<p>backup.sh 을 만들어서 chmod +x 해야 한다!</p>
<pre><code>#!/bin/bash
# 로그 파일을 날짜가 적힌 이름으로 백업 폴더에 복사하는 스크립트
mkdir -p /home/wonji/server_prac/backups
DATE=$(date +%Y%m%d_%H%M%S)
cp /home/wonji/server_prac/time_log.txt /home/wonji/server_prac/backups/log_backup_$DATE.txt
</code></pre>

<p>그리고 crontab -e 를 해서 아래를 추가해야 한다. 매 분마다 backup.sh 를 실행하라는 뜻이다.
5개의 별은 순서대로 분, 시, 일, 월, 요일을 의미</p>
<pre><code>* * * * * /home/wonji/server_prac/backup.sh
</code></pre>

<p><img src="/photos/working.png" alt="working" /></p>

<p><img src="/photos/working_well.png" alt="working well" /></p>]]></content><author><name>Wonji Lee</name></author><category term="Linux" /><category term="Other" /><summary type="html"><![CDATA[리눅스… 리눅스를 좋아한다. 이번 학기에 운영체제를 배우면서 리눅스에 대해 더 자세히 알게 되었는데 역시 흥미롭다. 외울 게 산더미고 가끔 지루하지만.. ^^; 원래 ‘리눅스 1주차’ 에서 자주 쓰는 명령어를 다시 공부하려고 했는데 음~ 대강 기억나기 때문에 (그리고 모르면 구글링하면 되니까) 잘 모르고 있는 것들을 실습하고 싶었다. 오늘은 간단하게 좀비 프로세스랑 크론을 실습해봤다.]]></summary></entry><entry><title type="html">실시간 경제 뉴스 감성 분석 파이프라인 구축기 (Part 1)</title><link href="https://w1024ji.github.io/semiconductor%20sentiment/2026/05/09/semiconductor-part01.html" rel="alternate" type="text/html" title="실시간 경제 뉴스 감성 분석 파이프라인 구축기 (Part 1)" /><published>2026-05-09T00:00:00+00:00</published><updated>2026-05-09T00:00:00+00:00</updated><id>https://w1024ji.github.io/semiconductor%20sentiment/2026/05/09/semiconductor-part01</id><content type="html" xml:base="https://w1024ji.github.io/semiconductor%20sentiment/2026/05/09/semiconductor-part01.html"><![CDATA[<h3 id="1-프로젝트-시작-계기-motivation">1. 프로젝트 시작 계기 (Motivation)</h3>
<p>저번까지 다양한 데이터를 다루고 파이프라인을 구축해 왔지만, “데이터를 적재하는 것을 넘어, 그 위에서 돌아가는 AI 모델의 라이프사이클을 직접 통제해 보고 싶다”는 목표가 생겼다.
ML Flow 에 대해서 궁금하기도 했고. 난 데이터랑 AI 둘 다 좋아해서 ㅎㅎ
그리고 ai 때문에 반도체 뉴스가 많이 올라올 거 같아서 분야는 반도체 산업으로 선택했다.</p>

<p>그래서 완벽하게 정제된 토이 데이터셋(Toy Dataset) 대신, 끊임없이 변하는 날것의 데이터(Real-world Data)를 다뤄보기 위해 ‘글로벌 반도체 뉴스 감성 분석(Sentiment Analysis)’ 프로젝트를 시작했습니다. 뉴스의 텍스트 데이터를 수집하고, AI 모델로 긍정/부정을 평가한 뒤, 이 모델들의 성능을 체계적으로 추적(ML Tracking)하는 것이 이번 프로젝트의 핵심이다.</p>

<h3 id="2-전체-아키텍처-및-파이프라인-architecture">2. 전체 아키텍처 및 파이프라인 (Architecture)</h3>
<p>본 프로젝트는 확장성과 효율성을 고려하여 클라우드 및 최신 데이터 스택을 적극 활용하려고 했다. 
전체 구조는 아래와 같다.</p>

<p>Data Source: NewsAPI (글로벌 반도체, NVIDIA, TSMC 등 영문 기사 수집)</p>

<p>Storage (Bronze Layer): AWS S3 (Raw 데이터를 Parquet 포맷으로 일자별 파티셔닝 적재)</p>

<p>Processing: Databricks (PySpark / Pandas)</p>

<p>AI Models: Hugging Face 사전 학습 모델 (Baseline 모델 vs. FinBERT)</p>

<p>MLOps Tracking: MLflow (실험 파라미터 및 메트릭 로깅)</p>

<h3 id="3-마주한-문제와-트러블슈팅-troubleshooting">3. 마주한 문제와 트러블슈팅 (Troubleshooting)</h3>
<p>오늘은 간단하게 환경 세팅과, Databricks 에서 두 개의 모델을 실험 해봤다. 역시 예상대로의 결과이지만, 그래도 재밌었다. 이게 목표가 아니니까!</p>

<h4 id="issue-databricks-serverless-환경의-s3-접근-차단">Issue: Databricks Serverless 환경의 S3 접근 차단</h4>
<p>상황: Databricks 노트북에서 Spark 코어 설정(spark.conf.set)을 통해 S3 자격 증명을 주입하려 했으나, 최신 Serverless Compute의 강력한 보안 정책(Unity Catalog)으로 인해 접근이 원천 차단됐었다. 
Free Tier 를 사용하고 있어서 (Free Tier인게 이유였다.) 흠 어떡하지.. 고민하다가 우회를 하기로 했다.</p>

<p>해결 (우회 전략): 클러스터 생성 권한이 제한된 상황에서, Spark 엔진 대신 Pandas(pd.read_parquet)를 앞단에 내세워 메모리로 데이터를 먼저 읽어오는 방식을 택했다. Python 환경 변수에 임시로 자격 증명을 주입하여 S3를 뚫고 데이터를 가져온 뒤, 이를 다시 분산 처리용 Spark DataFrame으로 변환(spark.createDataFrame)하여 문제를 우회 해결했다.</p>

<h3 id="4-배운-점">4. 배운 점</h3>
<ul>
  <li>포맷의 중요성: JSON보다 Parquet</li>
</ul>

<p>전에 Parquet 이 얼마나 효율적인지 경험해서, 이번 프로젝트는 바로 Parquet 가지고 시작했다.
데이터 수집 단계부터 파싱 리소스가 큰 JSON 대신 Parquet 포맷을 채택했고, 덕분에 이후 Databricks로 데이터를 읽어 들일 때 편했다.</p>

<ul>
  <li>도메인 특화 AI 모델의 위력과 MLflow의 존재 이유</li>
</ul>

<p>동일한 뉴스 데이터를 가지고 두 가지 모델을 비교 실험했다.</p>

<p>Baseline 모델 (SST-2 기반): “삼성전자 노동 쟁의(labor dispute)” 뉴스를 일반적인 문맥으로 해석해 ‘긍정(Positive) 99%’로 잘못 분류했다. (당연한 결과였다)</p>

<p>FinBERT (금융 특화 모델): 경제적 관점에서 생산 차질 리스크를 정확히 이해하고 ‘부정(Negative) 95%’로 정확하게 분류함. (역시 역시! labor dispute 이라는 걸 잘 잡았다)</p>

<p>단순히 “FinBERT가 더 좋네”가 아니라, MLflow를 통해 각 실험의 모델 이름, 샘플 사이즈, 긍정 뉴스 비율을 대시보드에 나란히 로깅함으로써 “왜 이 모델을 프로덕션에 배포해야 하는지”를 알게 되었다.</p>

<hr />

<p>(Part 2에서 계속… 다음 편에서는 최고의 성능을 보여준 FinBERT 모델을 Model Registry에 등록하고 배포 파이프라인을 구축하는 과정을 다룰 예정)</p>]]></content><author><name>Wonji Lee</name></author><category term="Semiconductor Sentiment" /><category term="Other" /><summary type="html"><![CDATA[1. 프로젝트 시작 계기 (Motivation) 저번까지 다양한 데이터를 다루고 파이프라인을 구축해 왔지만, “데이터를 적재하는 것을 넘어, 그 위에서 돌아가는 AI 모델의 라이프사이클을 직접 통제해 보고 싶다”는 목표가 생겼다. ML Flow 에 대해서 궁금하기도 했고. 난 데이터랑 AI 둘 다 좋아해서 ㅎㅎ 그리고 ai 때문에 반도체 뉴스가 많이 올라올 거 같아서 분야는 반도체 산업으로 선택했다.]]></summary></entry><entry><title type="html">Tree</title><link href="https://w1024ji.github.io/leetcode/2026/04/30/leetcode-tree.html" rel="alternate" type="text/html" title="Tree" /><published>2026-04-30T00:00:00+00:00</published><updated>2026-04-30T00:00:00+00:00</updated><id>https://w1024ji.github.io/leetcode/2026/04/30/leetcode-tree</id><content type="html" xml:base="https://w1024ji.github.io/leetcode/2026/04/30/leetcode-tree.html"><![CDATA[<h3 id="1-invert-binary-tree-easy">1. Invert Binary Tree (Easy)</h3>

<ul>
  <li>시간 복잡도는 O(N) 이다. N은 노드의 개수</li>
  <li>공간 복잡도는 O(H) 이다. H는 트리의 높이</li>
  <li>파이썬에서의 swap 은 쉽다. left, right = right, left</li>
  <li>그리고 트리에서는 재귀를 자주 쓴다. 제일 첫 루트부터 하나씩 아래 노드로 가면서 재귀를 하면 된다.</li>
</ul>

<pre><code class="language-python"># Definition for a binary tree node.
# class TreeNode:
#     def __init__(self, val=0, left=None, right=None):
#         self.val = val
#         self.left = left
#         self.right = right
class Solution:
    def invertTree(self, root: Optional[TreeNode]) -&gt; Optional[TreeNode]:
        if root is None:
            return None
        # swap!
        root.left, root.right = root.right, root.left
        # recursion
        self.invertTree(root.left)
        self.invertTree(root.right)
        
        return root
</code></pre>

<h3 id="2-maximum-depth-of-binary-tree-easy">2. Maximum Depth of Binary Tree (Easy)</h3>

<ul>
  <li>이 문제도 재귀를 사용해서 풀어야 했다. 트리의 깊이가 얼마냐? 를 묻는 문제였다. 아까 1번 문제에서는 제일 위 루트에서부터 재귀를 돌렸다면, 이번에는 제일 밑바닥의 노드에서부터 총 계산한 깊이에 1 (자기 자신)을 더함으로써 다시 총 깊이를 갱신하는 모습이다.</li>
  <li>꼭 메서드 호출할 때는 self. 를 써야 한다!!</li>
</ul>

<pre><code class="language-python">class Solution:
    def maxDepth(self, root: Optional[TreeNode]) -&gt; int:
        if root is None:
            return 0
            
        # 밑바닥에서 올라온 결과에 1을 더하자
        left_height = self.maxDepth(root.left)
        right_height = self.maxDepth(root.right)

        # 1은 나 자신 + 내 아래의 최대
        return 1 + max(left_height, right_height)
</code></pre>

<ul>
  <li>iteration (반복)</li>
</ul>

<pre><code class="language-python">from collections import deque

class Solution:
    def maxDepth(self, root: Optional[TreeNode]) -&gt; int:
        if root is None:
            return 0
        
        # (중요!) 큐를 만들고, 1층의 시작점인 root를 먼저 세웁니다.
        queue = deque([root])
        depth = 0
        
        while queue:
            # 현재 큐에 있는 노드 개수 == '이번 층의 전체 인원'
            level_size = len(queue)
            
            for _ in range(level_size):
                curr_node = queue.popleft() 
                
                # (중요)뺀 노드에게 자식이 있다면 큐의 맨 뒤에 다음 층 멤버로 줄을 세웁니다.
                if curr_node.left:
                    queue.append(curr_node.left)
                if curr_node.right:
                    queue.append(curr_node.right)
            
            # 한 층(Level)을 전부 확인 완료 -&gt; 깊이 +1 해준다
            depth += 1
            
        return depth
</code></pre>

<h3 id="3-same-tree-easy">3. Same Tree (Easy)</h3>

<ul>
  <li>재귀를 쓸 때는 while문을 쓰지 않는 것이 원칙이다.</li>
  <li>재귀에서는 if 를 통한 종료 조건 처리가 중요하다.</li>
</ul>

<pre><code class="language-python">class Solution:
    def isSameTree(self, p: Optional[TreeNode], q: Optional[TreeNode]) -&gt; bool:
        if not p and not q:
            return True
        
        if not p or not q:
            return False

        if p.val != q.val:
            return False

        return self.isSameTree(p.left, q.left) and self.isSameTree(p.right, q.right)
</code></pre>

<h3 id="4-lowest-common-ancestor-of-a-binary-search-tree-medium">4. Lowest Common Ancestor of a Binary Search Tree (Medium)</h3>

<ul>
  <li>LCA(공간 공통 조상)를 찾는 과정은 한마디로 “갈림길(Split Point) 찾기”라고 정의할 수 있다.
    <ol>
      <li>동반 하강: 만약 p와 q가 둘 다 현재 노드보다 작다면, 둘은 모두 현재 노드의 왼쪽 어딘가에 살고 있다. 그럼 왼쪽으로 내려가야 한다.</li>
      <li>동반 이동: 만약 p와 q가 둘 다 현재 노드보다 크다면, 둘은 모두 현재 노드의 오른쪽 어딘가에 살고 있다. 그럼 오른쪽으로 내려가야 한다.</li>
      <li>갈림길 발견 (LCA): 만약 p는 작고 q는 크다면(혹은 그 반대), 혹은 현재 노드가 p나 q 중 하나라면? 바로 여기가 두 갈래 길로 나뉘는 지점! 즉, 현재 노드가 바로 조상이다.</li>
    </ol>
  </li>
  <li>BST의 LCA 알고리즘은 이진 탐색과 완전히 동일한 시간 복잡도 O(H)를 가진다. 일반적인 이진 트리(Binary Tree)였다면 모든 노드를 다 뒤져야 하므로 O(N)이 걸렸겠지만, BST의 ‘정렬된 성질’ 덕분에 탐색 성능을 획기적으로 올린 케이스이다.</li>
  <li>데이터베이스 엔진에서 LCA 개념은 두 데이터 블록의 공통 상위 페이지를 찾거나, 트리의 균형(Rebalancing)을 맞출 때 아주 중요하게 사용된다.</li>
  <li>재귀 없이 반복문(<code>while</code>)만으로도 완벽하게 풀 수 있다</li>
</ul>

<pre><code class="language-python">class Solution:
    def lowestCommonAncestor(self, root: 'TreeNode', 
													    p: 'TreeNode', q: 'TreeNode') -&gt; 'TreeNode':
        curr = root

        while curr:
            if p.val &gt; curr.val and q.val &gt; curr.val:
                curr = curr.right
            elif p.val &lt; curr.val and q.val &lt; curr.val:
                curr = curr.left
            else: # here is LCA
                return curr
</code></pre>

<h3 id="5-binary-tree-level-order-traversal-medium">5. Binary Tree Level Order Traversal (Medium)</h3>

<ul>
  <li>2번 문제랑 굉장히 비슷하다!!!!</li>
  <li>BFS를 구현할 때 while 문 안에 for 루프를 넣어야 한다!</li>
  <li>큐를 준비하고 - collections.deque - root 을 []리스트로 감싸서 넣어줘야 한다. 왜냐면 deque를 사용할 땐 deque() 안에 iterable 한 객체를 넣어야 하는데, []없이 root 만 넣으면 에러가 난다!!</li>
  <li>level_size는 이번 층에 있는 노드 개수</li>
  <li>current_level은 나중에 result 에 담을 그 층의 노드들의 값의 모임이다.</li>
</ul>

<pre><code class="language-python">from collections import deque

class Solution:
    def levelOrder(self, root: Optional[TreeNode]) -&gt; List[List[int]]:
        if not root:
            return []
        
        result = []
        queue = deque([root])
        
        while queue:
            level_size = len(queue) 
            current_level = []
            
            for _ in range(level_size):
                node = queue.popleft()
                current_level.append(node.val)
                
                # 자식들을 대기열(큐)의 맨 뒤에 세움
                # 즉, 그 다음 레벨들의 노드들을 넣음
                if node.left:
                    queue.append(node.left)
                if node.right:
                    queue.append(node.right)
            
            # 한 층의 탐색이 끝나면 결과에 추가
            result.append(current_level)
            
        return result
</code></pre>

<h3 id="6-validate-binary-search-tree-medium">6. Validate Binary Search Tree (Medium)</h3>

<ul>
  <li>만약 5 노드 왼쪽에 4가 있는데, 4의 아래 오른쪽에 7이 있다면 이건 BST 가 아니다. BST 의 유효성 검사를 어떻게 해야 할까?
    <ul>
      <li>바로바로~ 범위를 정해서 이 안에 들어오는 지 아닌지 검사하자!</li>
      <li>7의 자리에는 5보다는 작고 4보다는 큰 수가 들어와야 한다.</li>
    </ul>
  </li>
  <li>즉, 5의 왼쪽 서브 트리는 모두 5보다 작아야 하고</li>
  <li>반대로 오른쪽 서브 트리는 모두 5보다 커야 한다.</li>
  <li>이 범위를 재귀로 검사하기 위해선 isValidBST() 함수 안에 도우미 함수를 만드는 게 편하다. validate() 라는 도우미 함수를 만들었다.</li>
  <li>return 문을 유심히 보라!!</li>
</ul>

<pre><code class="language-python">import math

class Solution:
    def isValidBST(self, root: Optional[TreeNode]) -&gt; bool:
        # 처음에는 최소값을 -무한대, 최대값을 +무한대로 설정한다
        def validate(node, low=-math.inf, high=math.inf):
            if not node: # 빈 노드라면
                return True
            if node.val &lt;= low or node.val &gt;= high: # 범위를 벗어났다면 실패
                return False
            
            # 왼쪽 노드와 오른쪽 노드에게 어떻게 넘길 것인가?
            return (validate(node.left, low, node.val) and validate(node.right, node.val, high))

        return validate(root)
</code></pre>]]></content><author><name>Wonji Lee</name></author><category term="LeetCode" /><category term="Other" /><summary type="html"><![CDATA[1. Invert Binary Tree (Easy)]]></summary></entry><entry><title type="html">Stack &amp;amp; Bianry Search</title><link href="https://w1024ji.github.io/leetcode/2026/04/29/leetcode-stack-and-binary-search.html" rel="alternate" type="text/html" title="Stack &amp;amp; Bianry Search" /><published>2026-04-29T00:00:00+00:00</published><updated>2026-04-29T00:00:00+00:00</updated><id>https://w1024ji.github.io/leetcode/2026/04/29/leetcode-stack-and-binary-search</id><content type="html" xml:base="https://w1024ji.github.io/leetcode/2026/04/29/leetcode-stack-and-binary-search.html"><![CDATA[<h3 id="1-valid-parentheses-easy">1. Valid Parentheses (Easy)</h3>

<ul>
  <li>if else 를 쓸 때는 조건을 유심히 봐야 한다. 불필요한 if else 문을 쓸 수 있고 이건 더 긴 런타임을 유발한다.</li>
  <li>예를 들어, if not stack or stack[-1] ≠ parentheses[p] 라는 조건을 통과하면 무조건 리턴 되므로 이 조건 다음에 stack.pop()을 써도 괜찮다.</li>
</ul>

<pre><code class="language-python">class Solution:
    def isValid(self, s: str) -&gt; bool:
        parentheses = {
            ")":"(",
            "]":"[",
            "}":"{"
        }
        stack = []

        for p in s:
            if p in "({[":
                stack.append(p)
            else:
                if not stack or stack[-1] != parentheses[p]:
                    return False
                stack.pop()
        
        return len(stack) == 0
</code></pre>

<h3 id="2-min-stack-medium">2. Min Stack (Medium)</h3>

<ul>
  <li>파이썬에 대해 더 알게 되었고, 동시에 굉장히 재밌었다!</li>
  <li>class 안에 전역 변수를 만들 때 아무생각 없이 class MinStack 바로 안에 stack = [] 을 선언했는데, 그러면 MinStack 으로 생성되는 모든 인스턴스가 그걸 공유하게 된다. (안돼~~!!) 그러므로 꼭 이 하나의 인스턴스의 stack 이라는 변수라는 걸 알려주기 위해 self.stack = [] 을 <strong>init</strong>() 에 선언해야 하고, 다른 메서드에서 사용할 때도 반드시 그냥 stack 이 아니라 self.stack 이라고 해야 한다.</li>
  <li>getMin() 은 이 스택의 원소들 중 최소값을 리턴해야 한다. 그런데 내가 처음에 생각했던 방안 - push() 될 때마다 min_value 를 갱신하는 것 - 은 엄청난 취약점이 있다. 만약 스택에 [5, 3, 2] 가 들어있었는데 2가 pop 된 후에 getMin 을 한다면? min_value 는 pop 된 숫자도 가질 수 있다!!!</li>
  <li>해결방안: push() 를 할 때 현재 들어온 값과 이 시점까지의 최소값을 튜플로 묶어서 스택에 넣어준다. 그리고 현재 들어온 값과 바로 아래층에 기록된 최소값 중 더 작은 것을 선택한다!</li>
</ul>

<pre><code class="language-python">class MinStack:
    def __init__(self):
        self.stack = []
        
    def push(self, val: int) -&gt; None:
        if not self.stack:
            self.stack.append((val, val))
        else:
            # 방금 들어온 값(val)과 바로 아래층에 기록된 최소값 중 더 작은 것을 선택!
            current_min = self.stack[-1][1]
            # (현재 들어온 값, 이 시점까지의 최소값) 을 튜플로 묶어서 스택에 넣어준다
            self.stack.append((val, min(val, current_min)))

    def pop(self) -&gt; None:
        if self.stack:
            self.stack.pop()

    def top(self) -&gt; int:
        return self.stack[-1][0]

    def getMin(self) -&gt; int:
        return self.stack[-1][1]
</code></pre>

<h3 id="3-binary-search-easy">3. Binary Search (Easy)</h3>

<ul>
  <li>iteration 방법으로 구현한 이진 검색이다.</li>
  <li>여기서 중요한 건, mid 를 어떻게 계산할 것이냐이다.</li>
  <li>만약 mid = (left + right) // 2를 한다면 stack overflow 가 일어날 가능성이 높다.</li>
  <li>그래서 “거리”의 관점으로, left 에 (right - left) // 2 를 한 거리를 더해주는 방식으로 stack overflow 를 방지할 수 있다.</li>
  <li>그리고 while 조건에 left ≤ right 하는 걸 잊지 말자!!!! left &lt; right 라고만 하면 모든 테스트 케이스를 통과하지 못한다. 왜인지는 여러 nums 경우를 생각하면 된다.</li>
</ul>

<pre><code class="language-python">class Solution:
    def search(self, nums: List[int], target: int) -&gt; int:
        left, right = 0, len(nums) - 1
        while left &lt;= right:
            mid = left + (right - left) // 2

            if nums[mid] &lt; target:
                left = mid + 1
            elif nums[mid] &gt; target:
                right = mid - 1
            else:
                return mid

        return -1
</code></pre>

<h3 id="4-search-a-2d-matrix-medium">4. Search a 2D Matrix (Medium)</h3>

<ul>
  <li>이 문제를 처음 봤을 때 나는 이렇게 생각했다. 수직으로 이진 탐색 해서 O(logM), 그 후에 수평으로 탐색해서 O(logN) 을 하면 되려나?</li>
  <li>좋은 아이디어이지만, 더! 좋은 아이디어가 있다.</li>
  <li>각 행의 원소 값이 아래로 갈 수록 커지고, 각 열의 원소 값이 오른쪽으로 갈 수록 커진다면, 이 행들을 쭉~ 연결해서 하나의 리스트로 취급할 수 있다! 즉, 예를 들어 3x4 행렬이라면, 12개의 원소를 가진 1차원 배열로 볼 수 있는 것이다.</li>
  <li>행의 개수는 len(matrix), 열의 개수는 len(matrix[0]) 로 간단히 구할 수 있었다.</li>
  <li>matrix[row][col]해서 target 을 찾을 때 row 는 n을 mid 로 나눈 몫으로, 그리고 col은 n 을 mid로 나누고 남은 나머지로! 구할 수 있다!! 그대~로 이진 탐색을 하면 된다.</li>
</ul>

<pre><code class="language-python">class Solution:
    def searchMatrix(self, matrix: List[List[int]], target: int) -&gt; bool:
        m = len(matrix)
        n = len(matrix[0])

        left = 0
        right = m*n -1

        while left &lt;= right:
            mid = left + (right - left) // 2
            # 2D가 1D라고 생각하고 mid를 잡고 그거의 행렬의 실제 위치를 계산하자!
            row = mid // n
            col = mid % n

            mid_value = matrix[row][col]

            if mid_value == target:
                return True
            elif mid_value &lt; target:
                left = mid + 1
            else:
                right = mid - 1
        return False   
</code></pre>]]></content><author><name>Wonji Lee</name></author><category term="LeetCode" /><category term="Other" /><summary type="html"><![CDATA[1. Valid Parentheses (Easy)]]></summary></entry><entry><title type="html">Linked List</title><link href="https://w1024ji.github.io/leetcode/2026/04/28/leetcode-linked-list.html" rel="alternate" type="text/html" title="Linked List" /><published>2026-04-28T00:00:00+00:00</published><updated>2026-04-28T00:00:00+00:00</updated><id>https://w1024ji.github.io/leetcode/2026/04/28/leetcode-linked-list</id><content type="html" xml:base="https://w1024ji.github.io/leetcode/2026/04/28/leetcode-linked-list.html"><![CDATA[<h3 id="1-reverse-linked-list-easy">1. Reverse Linked List (Easy)</h3>

<ul>
  <li>링크드 리스트를 반대로 뒤집고 싶으면 어떻게 해야 할까?</li>
  <li>크게 세가지 변수(포인터)를 준비하면 된다. 과거, 현재, 미래를 의미하는 포인터들이다.</li>
  <li>curr = head 로 ‘지금 조작할 노드’를 선택해주고,</li>
  <li>nxt = curr.next 로</li>
</ul>

<pre><code class="language-python"># Definition for singly-linked list.
# class ListNode:
#     def __init__(self, val=0, next=None):
#         self.val = val
#         self.next = next
class Solution:
    def reverseList(self, head: Optional[ListNode]) -&gt; Optional[ListNode]:
        prev = None
        curr = head

        while curr is not None: # 현재 작업할 노드가 존재하면
            nxt = curr.next
            
            # 여기가 중요! 
            curr.next = prev # 지금 노드의 화살표를 prev 로 뒤 노드를 향하게 한다!

            prev = curr
            curr = nxt
        
        return prev
        
</code></pre>

<h3 id="2-merge-two-sorted-lists-easy">2. Merge Two Sorted Lists (Easy)</h3>

<ul>
  <li>dummy = ListNode() 를 만들어야 시작점을 잃어버리지 않을 수 있다. 그대신 직접적으로 사용하는 건 아니다!</li>
  <li>대신, curr = dummy 변수를 만들어서 이걸 가지고 노드를 이어줄거야~ (얘가 돌아다니는 거임)</li>
</ul>

<pre><code class="language-python">class Solution:
    def mergeTwoLists(self, list1: Optional[ListNode], list2: Optional[ListNode]) -&gt; Optional[ListNode]:
        dummy = ListNode()
        curr = dummy

        while list1 and list2:
            if list1.val &lt;= list2.val:
                curr.next = list1
                list1 = list1.next
            else:
                curr.next = list2
                list2 = list2.next
            curr = curr.next

        if list1:
            curr.next = list1
        elif list2:
            curr.next = list2

        return dummy.next

</code></pre>

<h3 id="3-linked-list-cycle-easy">3. Linked List Cycle (Easy)</h3>

<ul>
  <li>이 링크드 리스트에 순환(사이클)이 있는가? 를 검증하는 메서드를 만들어 보자</li>
  <li>‘토끼와 거북이’ 방법을 쓰면 된다!</li>
  <li>fast 랑 slow 변수를 만들어서 slow 는 한 번에 한 노드씩 움직이고, fast 는 두 개의 노드씩 움직여서, 만약에 이 링크드 리스트가 순환이라면 꼭 둘이 만나게 된다.</li>
  <li>무한 루프가 도는 거 아닌가? 해서 while 문 조건으로 ‘fast is not None and fast.next is not None’ 을 썼다. 그래서 만약 순환이 아니라 끊기는 지점이 있다면 True 를 얻기 전에 while문을 탈출하게 되고 결국 return False 하게 된다. 그래서 걱정 노노!</li>
</ul>

<pre><code class="language-python">class Solution:
    def hasCycle(self, head: Optional[ListNode]) -&gt; bool:
        slow = head
        fast = head

        while fast is not None and fast.next is not None:
            slow = slow.next
            fast = fast.next.next

            if fast == slow: return True
        
        return False
</code></pre>

<p>리스트가 비었을 때도 생각해야 한다</p>

<pre><code class="language-python">Constraints:

The number of the nodes in the list is in the range [0, 104].
-105 &lt;= Node.val &lt;= 105
 

Follow up: Can you solve it using O(1) (i.e. constant) memory?
</code></pre>

<h3 id="4-remove-nth-node-from-end-of-list-medium">4. Remove Nth Node From End of List (Medium)</h3>

<ul>
  <li>앞에서 N번째가 아니라 뒤에서 N번째를 제거하려면 어떻게 해야 할까?</li>
  <li>아까 위에서 풀었던 것처럼 토끼와 거북이 방식을 사용해보자.</li>
  <li>fast 를 먼저 n 번 가도록 하고, 그 다음에 둘이 함께 돌리면 (둘 다 한 칸씩 전진) 그러면 fast가 마지막 노드를 만났을 때 (== fast.next is None 일 때) 가 slow는 제거해야 하는 그 노드의 바로 앞 노드에 위치하게 된다.</li>
  <li>slow.next = slow.next.next 로 제거하고 싶은 그 노드를 건너 뛰어서 연결하면 된다.</li>
</ul>

<pre><code class="language-python">class Solution:
    def removeNthFromEnd(self, head: Optional[ListNode], n: int) -&gt; Optional[ListNode]:
        dummy = ListNode(0, head)
        fast = dummy
        slow = dummy

        for _ in range(n):
            fast = fast.next

        while fast.next is not None:
            fast = fast.next
            slow = slow.next
        
        slow.next = slow.next.next

        return dummy.next
</code></pre>

<h3 id="5-reorder-list-medium">5. Reorder List (Medium)</h3>

<ul>
  <li>아주…. 애먹었던 문제이다.</li>
  <li>주석에 자세하게 썼다!</li>
</ul>

<pre><code class="language-python">class Solution:
    def reorderList(self, head: Optional[ListNode]) -&gt; None:
        if not head or not head.next:
            return

        # 중간 찾기 (토끼와 거북이)
        slow = head
        fast = head
        while fast and fast.next:
            slow = slow.next
            fast = fast.next.next

        curr = slow.next # 시작점을 잡고,
        slow.next = None # 가위로 잘라주기!

        prev = None
        while curr is not None: 
            nxt = curr.next
            curr.next = prev 
            prev = curr
            curr = nxt
        
        # 번갈아 가며 연결하기
        first = head       # 앞 덩어리의 시작
        second = prev      # 뒤집힌 뒷 덩어리의 시작

        while second:
            # 1. 길이 끊기기 전에 각각의 '다음 노드'를 임시 대피소에 저장한다.
            tmp1 = first.next
            tmp2 = second.next
            
            # 2. 앞 노드가 뒷 노드를 가리키게 한다. 
            first.next = second
            
            # 3. 뒷 노드가 아까 저장해둔 앞 노드의 다음을 가리키게 한다.
            second.next = tmp1
            
            # 4. 두 포인터 모두 다음 작업 위치로 전진!
            first = tmp1
            second = tmp2
</code></pre>]]></content><author><name>Wonji Lee</name></author><category term="LeetCode" /><category term="Other" /><summary type="html"><![CDATA[1. Reverse Linked List (Easy)]]></summary></entry><entry><title type="html">Pointers &amp;amp; Sliding Windows</title><link href="https://w1024ji.github.io/leetcode/2026/04/27/leetcode-pointers-and-sliding-window.html" rel="alternate" type="text/html" title="Pointers &amp;amp; Sliding Windows" /><published>2026-04-27T00:00:00+00:00</published><updated>2026-04-27T00:00:00+00:00</updated><id>https://w1024ji.github.io/leetcode/2026/04/27/leetcode-pointers-and-sliding-window</id><content type="html" xml:base="https://w1024ji.github.io/leetcode/2026/04/27/leetcode-pointers-and-sliding-window.html"><![CDATA[<h3 id="1-valid-palindrome-easy">1. Valid Palindrome (Easy)</h3>

<ul>
  <li>Palindrome: 앞으로 읽나, 뒤로 읽나 → 같으면 palindrome 이라고 한다.</li>
  <li>여기서는 ‘removing all non-alphanumeric characters’ 라는 조건이 있었으므로 .isalnum() 을 쓰는 게 중요했다.</li>
  <li>그리고 모든 알파벳들을 lower 로 일관되게 해준다. .lower()</li>
  <li>two pointer 를 사용하는 게 핵심! 양 끝에서 left, right 을 잡아주고 점점 가운데로 오면서 (isalnum() 이 아닌 것들은 무시.) 양쪽이 대칭으로 같다면 → True. 하나라도 아니라면 False!</li>
</ul>

<pre><code class="language-python">class Solution:
    def isPalindrome(self, s: str) -&gt; bool:
        left = 0
        right = len(s) - 1
        while left &lt; right:
            while left &lt; right and not s[left].isalnum():
                left += 1
            while left &lt; right and not s[right].isalnum():
                right -= 1

            if s[left].lower() != s[right].lower():
                return False
            left += 1
            right -= 1
        return True
</code></pre>

<h3 id="2-best-time-to-buy-and-sell-stock-easy">2. Best Time to Buy and Sell Stock (Easy)</h3>

<ul>
  <li>생각보다 헷갈려서 어려웠다.</li>
  <li>변수를 총 3개 잡아야 한다. min_price, current_profit, max_profit</li>
  <li>min_price: 여태까지의 경험한 최소 가격</li>
  <li>current_profit: 현재 가격에서 최소 가격을 뺀 이익 (price - min_price)</li>
  <li>max_profit: 내가 경험한 이익 중에서 가장 큰 이익 max()</li>
  <li>결국, max_profit 을 업데이트하면서 가장 컸던 이익을 리턴한다.</li>
  <li>변수를 새로 만드는 거에 너무 부담갖지 말자! for 문이나 while 문 아니면 변수 생성은 시간 복잡도를 잡아먹지 않아!</li>
</ul>

<pre><code class="language-python">class Solution:
    def maxProfit(self, prices: List[int]) -&gt; int:
        min_price = 100000
        max_profit = 0 
        for price in prices:
            min_price = min(min_price, price)
            current_profit = price - min_price
            max_profit = max(current_profit, max_profit)

        return max_profit
</code></pre>

<h3 id="3-3sum-medium">3. 3Sum (Medium)</h3>

<ul>
  <li>어려웠던 문제! 하지만 재밌었다~</li>
  <li>일단, for 문을 시작하지 전에, nums 를 sort() 해주면 nums 자체가 정렬되므로, 작은 값은 왼쪽, 큰 값은 오른쪽에 정렬된다. (이는 나중에 i 랑 j 를 옮기는 데 효과적이다)</li>
  <li>일단, nums 리스트의 세 숫자를 잡고 있는 포인터가 필요하고, 그 중에서 기준 포인터는 k 이므로 for k in range() 를 리스트 왼쪽에서부터 차례로 돌리고, k를 포함한 왼쪽을 제외한 오른쪽의 구역을 가지고 i 와 j 를 포인터로 잘 써야 한다.</li>
  <li>nums[k] + nums[i] + nums[j] 을 total 이라고 두고, 이것이 0이라면 이 k, i, j 그룹이 정답이고, 미리 만들어둔 results에 리스트 형태로 append() 해준다.</li>
  <li>만약에 total 이 0보다 작다면, i 가 작은 놈이므로, 크게 만들어야 하니까 i 만 += 해준다.</li>
  <li>만약에 total 이 0보다 크다면, j 가 큰 놈이고, 얘를 작게 만들어야 하니까 j 만 -= 해준다.</li>
  <li>(왜냐하면 k, i, j 를 적절하게 맞춰서 0을 만들어야 하기 때문이다)</li>
</ul>

<pre><code class="language-python">class Solution:
    def threeSum(self, nums: List[int]) -&gt; List[List[int]]:
        nums.sort()
        length = len(nums)
        results = []

        for k in range(0, length - 2):
            # 1. 기준점 k가 이전 숫자와 똑같다면 건너뛰기 (중복 방지)
            if k &gt; 0 and nums[k] == nums[k - 1]:
                continue

            i = k + 1
            j = length - 1
            
            while i &lt; j:
                total = nums[k] + nums[i] + nums[j]
                
                if total == 0:
                    # 정답 추가!
                    results.append([nums[k], nums[i], nums[j]])
                    
                    # 2. i와 j도 중복된 숫자가 있다면 건너뛰기
                    while i &lt; j and nums[i] == nums[i + 1]:
                        i += 1
                    while i &lt; j and nums[j] == nums[j - 1]:
                        j -= 1
                        
                    # 3. 무한 루프 방지: 정답을 찾았으니 다음 숫자로 양쪽 다 이동!
                    i += 1
                    j -= 1
                    
                elif total &lt; 0:
                    i += 1
                else:
                    j -= 1

        return results
</code></pre>

<h3 id="4-container-with-most-water-medium">4. Container With Most Water (Medium)</h3>

<ul>
  <li>two pointer랑 greedy 방식으로 풀어야 했다.</li>
  <li>여기서 중요했던 건 if height[i] &lt; height[j]: 조건에서 i를 뒤로 밀거냐, 아니면 j를 앞으로 당길 거냐- 였다. 만약 i번째의 원소가 더 작다면 움직여서 높이를 늘려야 한다!</li>
  <li>그리고 꼭 max_area = max(curr_area, max_area) 로 갱신 시키기</li>
</ul>

<pre><code class="language-python">class Solution:
    def maxArea(self, height: List[int]) -&gt; int:
        i, j = 0, len(height) -1
        max_area = 0

        while i &lt; j:
            curr_area = (j - i) * min(height[i], height[j])
            max_area = max(curr_area, max_area)
            if height[i] &lt; height[j]: 
                i += 1
            else: 
                j -= 1

        return max_area

</code></pre>

<h3 id="5-longest-substring-without-repeating-characters-medium">5. Longest Substring Without Repeating Characters (Medium)</h3>

<ul>
  <li>Sliding window를 이용한 문제이다. 중복 문자가 s에 있을 때 어떻게 처리할 지가 관건이다.</li>
  <li>set() 메서드를 사용해서 종류를 먼저 얻는다.</li>
  <li>right를 가지고 지금 슬라이딩 윈도우 안에 중복이 들어오나 체크하고, 만약 들어온다면 left += 1 해서 뒤로 움직여준다. 이 과정을 반복하며 max 갱신.</li>
</ul>

<pre><code class="language-python">class Solution:
    def lengthOfLongestSubstring(self, s: str) -&gt; int:
        char_set = set() 
        left = 0
        max_len = 0
        
        for right in range(len(s)):
            # 중복이 없어질 때까지 left 포인터를 앞으로 이동시키며 바구니에서 뺍니다.
            while s[right] in char_set:
                char_set.remove(s[left])
                left += 1
                
            char_set.add(s[right])
            max_len = max(max_len, right - left + 1)
            
        return max_len

</code></pre>]]></content><author><name>Wonji Lee</name></author><category term="LeetCode" /><category term="Other" /><summary type="html"><![CDATA[1. Valid Palindrome (Easy)]]></summary></entry><entry><title type="html">Leetcode 문제 풀이</title><link href="https://w1024ji.github.io/leetcode/2026/04/26/leetcode-array-and-hash.html" rel="alternate" type="text/html" title="Leetcode 문제 풀이" /><published>2026-04-26T00:00:00+00:00</published><updated>2026-04-26T00:00:00+00:00</updated><id>https://w1024ji.github.io/leetcode/2026/04/26/leetcode-array-and-hash</id><content type="html" xml:base="https://w1024ji.github.io/leetcode/2026/04/26/leetcode-array-and-hash.html"><![CDATA[<p>2026년이 된 기념으로 뭐를 할까 고민하다가 LeetCode를 풀어봤다.
한 문제 한 문제씩 풀며 처음에 나는 어떻게 생각했고, 더 나은 풀이는 어떤 게 있었는지, 정답이랑 내가 처음에 생각했던 아이디어랑 비교하는 과정이 재밌었다.
문제를 풀면서 시간 복잡도랑 공간 복잡도를 더 고려하게 되고, 더 better 한 알고리즘은, 방식은 뭐가 있는지 찾으면서 세상에는 똑똑한 사람들이 참 많다고 느꼈다.
아무튼..
노션에만 적어둔건데, 기록용으로 깃허브에도 올리고 싶었다.</p>

<p>딱 6가지의 문제 유형만을 집중적으로 풀려고 노력했다.</p>

<ol>
  <li>Arrays &amp; Hashing</li>
  <li>Two Pointers &amp; Sliding Window</li>
  <li>Linked List</li>
  <li>Stack &amp; Binary Search</li>
  <li>Trees</li>
  <li>Graphs &amp; Dynamic Programming</li>
</ol>

<p>근데 LeetCode 에 sql 문제도 있더라? 나 sql 좋아하니까 그것도 해봐야지~~</p>

<h2 id="arrays--hashing">Arrays &amp; Hashing</h2>

<h3 id="1-two-sum-easy">1. Two Sum (Easy)</h3>

<ul>
  <li>enumerate() 를 써서 인덱스(i) 와 요소(num) 을 한번에 꺼내는 걸 알아야 한다.</li>
  <li>해시 - 딕셔너리 - 를 사용해서 seen={} 에 compare (즉, target과 num의 차이) 를 보관한다.</li>
  <li>만약 보관함에 알맞는 compare가 있을 경우, 리스트 형태로 감싸서 각 숫자의 인덱스를 반환!</li>
</ul>

<pre><code class="language-python">class Solution:
    def twoSum(self, nums: List[int], target: int) -&gt; List[int]:
        seen = {}
        for i, num in enumerate(nums):
            compare = target - num

            if compare in seen:
                return [seen[compare], i]
                
            seen[num] = i
</code></pre>

<h3 id="2-valid-anagram-easy">2. Valid Anagram (Easy)</h3>

<ul>
  <li>sorted() 는 timsort 를 써서 시간 복잡도는 O(NlogN)이고,</li>
  <li>공간 복잡도는 새 문자열을 각각 만드니까 (s_sort, t_sort) O(N) 이다.</li>
</ul>

<pre><code class="language-python">class Solution:
    def isAnagram(self, s: str, t: str) -&gt; bool:
        s_sort = sorted(s)
        t_sort = sorted(t)

        return s_sort == t_sort
</code></pre>

<h3 id="3-contains-duplicate-easy">3. Contains Duplicate (Easy)</h3>

<ul>
  <li>여기서 중요한 건 set(). set() 이란 중복을 허용하지 않고 순서가 없는 데이터의 모임이다.</li>
  <li>그래서 set() 으로 숫자들의 종류를 정리할 수 있다.</li>
</ul>

<pre><code class="language-python">class Solution:
    def containsDuplicate(self, nums: List[int]) -&gt; bool:
        # 전체 len 을 찾고, 그게 총 숫자의 종류보다 크면 True 아닐까?
        return len(nums) &gt; len(set(nums))       
</code></pre>

<h3 id="4-group-anagrams-medium">4. Group Anagrams (Medium)</h3>

<ul>
  <li>저번처럼 set() 을 쓰려다가 그러면 같은 애너그램을 가진 것들끼리 그룹을 나눌 수 없어서 버리고,</li>
  <li>사실 join() 을 쓸 줄 아느냐 마느냐가 컸다. 그리고 딕셔너리를 편하게 활용하자!</li>
  <li>key = ““.join(sorted(s))</li>
  <li>아마도 O(NlogN) 이다.</li>
</ul>

<pre><code class="language-python">class Solution:
    def groupAnagrams(self, strs: List[str]) -&gt; List[List[str]]:
        dicts = {}
        for s in strs:
            key = "".join(sorted(s))

            if key in dicts:
                dicts[key].append(s)
            else:
                dicts[key] = [s] # 이렇게 넣어줘야지 리스트 형태로 저장된다

        return list(dicts.values())
</code></pre>

<h3 id="5-top-k-frequent-elements-medium">5. Top K Frequent Elements (Medium)</h3>

<ul>
  <li>sorted() 는 Timsort 로 O(NlogN) 이 걸린다. 하지만 문제에서는 시간 복잡도가 O(NlogN) 보다 ‘빨라야 한다’ 라는 조건이 있었기에 어려운 문제였다.</li>
  <li>딕셔너리 - Hash Map - 을 사용해서 O(N) 으로 풀어야 했다.</li>
  <li>종류와 빈도수를 정리한 dicts =  {2:2, 1:3, 3:1} 를 얻는 것까지는 성공. 하지만 여기서 어떻게 값을 기준으로 k번 까지 큰 키들을 가져올 수 있을까가 이 문제의 관건이었다.</li>
  <li><em>sorted_items = sorted(dicts.items(), key=lambda x:x[1], reverse=True)</em> 를 써봤지만 sorted() 때문에 O(NlogN) 이므로 실패.</li>
  <li>heapq 가 솔루션이었다.</li>
  <li>import heapq 한 다음에, heap = [] 을 만들고 힙큐에 튜플 형태로 (빈도수, 종류) 넣어준다. 그리고 heappush(만든 힙, 튜플) 그리고 heappop(만든 힙) 을 이용하면 문제를 풀 수 있었다.</li>
  <li>마지막에 리턴할 때 힙에서 두번째 값(우리가 원하는 키)를 꺼내기 위해서는 for 문을 돌리면서 인덱스1번째를 가져와 리스트로 만드는 작업을 해야 한다.</li>
</ul>

<pre><code class="language-python">import heapq

class Solution:
    def topKFrequent(self, nums: List[int], k: int) -&gt; List[int]:
        dicts = {}
        for n in nums:
            if n in dicts:
                dicts[n] += 1
            else:
                dicts[n] = 1

        heap = []
        for num, freq in dicts.items():
            # 힙에는 튜플 형태로 (기준점, 데이터)를 넣습니다.
            # 빈도수를 기준으로 비교해야 하니까 freq를 앞에 둡니다!
            heapq.heappush(heap, (freq, num))

            if len(heap) &gt; k:
                heapq.heappop(heap)

        return [item[1] for item in heap]
</code></pre>

<h3 id="6-product-of-array-except-self-medium">6. Product of Array Except Self (Medium)</h3>

<ul>
  <li>문제에서 요구한 건 O(N) 이라서 이중 for문을 쓰면 안되었다. (보통 잘 쓰면 안되지만)</li>
  <li>참고로 product 는 곱이라는 뜻이다.</li>
  <li>관건은 ‘자기 자신을 제외하고 곱한다’ 를 어떻게 나눗셈을 쓰지 않고 계산할 수 있는가
    <ul>
      <li>왼쪽과 오른쪽으로 범위를 나누고 한 개의 리스트, 그리고 새로 나오는 리스트를 만들지 않고 바로 곱해서 리턴값을 만들어 낼 수 있는가? 였다.</li>
    </ul>
  </li>
  <li>참고로 insert(0, n) 을 쓰려다가 (append() 와 반대로 작동한다. 앞에다가 끼워넣는다. 하지만 기존의 원소들을 재배치하는 과정에서 O() 가 많이 발생.) 시간 복잡도 때문에 insert() 대신 for문을 잘 조작해야 했다
    <ul>
      <li>for i in range(len(nums) -1, -1, -1) 을 써야했다. for n in nums[::-1] 을 쓰고 싶었는데 기존의 리스트의 맨뒤 원소랑 곱하기 시작하려면 인덱스가 필요해서 i 를 만드는 수밖에 없었다.</li>
    </ul>
  </li>
</ul>

<pre><code class="language-python">class Solution:
    def productExceptSelf(self, nums: List[int]) -&gt; List[int]:
        answer = []
        multiples = 1

        for n in nums:
            answer.append(multiples) 
            multiples *= n           
        
        multiples2 = 1

        for i in range(len(nums)-1, -1, -1):
            answer[i] *= multiples2
            multiples2 *= nums[i]

        return answer
</code></pre>]]></content><author><name>Wonji Lee</name></author><category term="LeetCode" /><category term="Other" /><summary type="html"><![CDATA[2026년이 된 기념으로 뭐를 할까 고민하다가 LeetCode를 풀어봤다. 한 문제 한 문제씩 풀며 처음에 나는 어떻게 생각했고, 더 나은 풀이는 어떤 게 있었는지, 정답이랑 내가 처음에 생각했던 아이디어랑 비교하는 과정이 재밌었다. 문제를 풀면서 시간 복잡도랑 공간 복잡도를 더 고려하게 되고, 더 better 한 알고리즘은, 방식은 뭐가 있는지 찾으면서 세상에는 똑똑한 사람들이 참 많다고 느꼈다. 아무튼.. 노션에만 적어둔건데, 기록용으로 깃허브에도 올리고 싶었다.]]></summary></entry><entry><title type="html">Oracle Sentiment Project</title><link href="https://w1024ji.github.io/oracle%20sentiment%20analysis/2026/03/16/oracle-sentiment-project.html" rel="alternate" type="text/html" title="Oracle Sentiment Project" /><published>2026-03-16T00:00:00+00:00</published><updated>2026-03-16T00:00:00+00:00</updated><id>https://w1024ji.github.io/oracle%20sentiment%20analysis/2026/03/16/oracle-sentiment-project</id><content type="html" xml:base="https://w1024ji.github.io/oracle%20sentiment%20analysis/2026/03/16/oracle-sentiment-project.html"><![CDATA[<p>Yesterday’s goal: Let’s automize crawling process!
So, yesterday I set up EC2(ubuntu) in AWS and set up a Airflow inside that ubuntu.</p>

<p>I first looked for the Managed Airflow in AWS, but found out it is for big enterprises.
So I detoured to do on my EC2.</p>

<p>Built my airflow_env inside that ubuntu, and the settings..</p>

<p><code>
sudo apt update &amp;&amp; sudo apt upgrade -y
sudo apt install python3-pip python3-venv -y
</code>
<code>
python3 -m venv airflow_env
source airflow_env/bin/activate
</code>
<code>
pip install apache-airflow
pip install apache-airflow-providers-amazon
</code></p>

<hr />

<p>And I wrote DAG to run the crawling daily in the morning.
Of course I already set up the AWS connection in Airflow.</p>

<p>Once it was succeeded, I made the Airflow to run in the background, so it won’t stop even I turn off the ubuntu CLI.</p>

<p><code>nohup airflow standalone &gt; airflow_server.log 2&gt;&amp;1 &amp;</code></p>

<hr />

<p>And this is I saw in this morning!
It is working well, the DAG succeeded in 8am in the morning.</p>

<p><img src="/photos/airflow success.png" alt="airflow in the morningl" /></p>

<p>And the result is saved in S3. In the gold bucket.
I can see that the data for 15th was uploaded in this morning.</p>

<p><img src="/photos/s3 after airflow.png" alt="s3 in the morningl" /></p>

<p>I am gonna wait for 2 weeks how it goes.
Why 2 weeks? Cause it is my maxinum budget for AWS.
EC2 costs a lot.. More than I thought. Maybe because I chose t3.small not micro (bc of the airflow)</p>]]></content><author><name>Wonji Lee</name></author><category term="Oracle Sentiment Analysis" /><category term="Other" /><summary type="html"><![CDATA[Yesterday’s goal: Let’s automize crawling process! So, yesterday I set up EC2(ubuntu) in AWS and set up a Airflow inside that ubuntu.]]></summary></entry></feed>